How to Install Permanent LED Lights on a Roofline: Step-by-Step
A detailed guide for professional lighting contractors on how to install permanent LED lights on a roofline, covering everything from product selection to client handoff.
Installing permanent LED lights on a roofline requires a meticulous process of planning, precise measurement, and careful execution of mounting and wiring. The core steps involve selecting a commercial-grade, IP67-rated lighting system, preparing the roofline surface by cleaning it thoroughly, securely mounting a dedicated track or channel, installing the LED pucks, running low-voltage wiring, and connecting the system to a power supply and a smart controller for programming.
Why Perfect Roofline Lighting is a Game-Changer for Your Business
As a professional lighting contractor, you know that the demand for permanent holiday and architectural lighting is exploding. Homeowners want beautiful, customizable lighting that they don’t have to put up and take down every year. For them, it’s about convenience, safety, and stunning curb appeal. For you, it’s a high-value, year-round revenue stream that sets you apart from seasonal-only installers. Mastering the art of roofline installation isn’t just another service to offer—it’s a cornerstone of a modern, profitable lighting business. This guide provides a detailed, step-by-step process for achieving flawless, professional-grade permanent roofline installations that will delight your clients and stand the test of time.
Pre-Installation Planning: The Blueprint for Success
A successful permanent lighting project is 90% planning and 10% execution. Rushing this phase is the most common mistake contractors make, leading to costly errors, wasted materials, and unhappy clients. A thorough plan ensures efficiency on-site and a result that matches the client’s vision.
What Should Be Included in a Site Assessment?
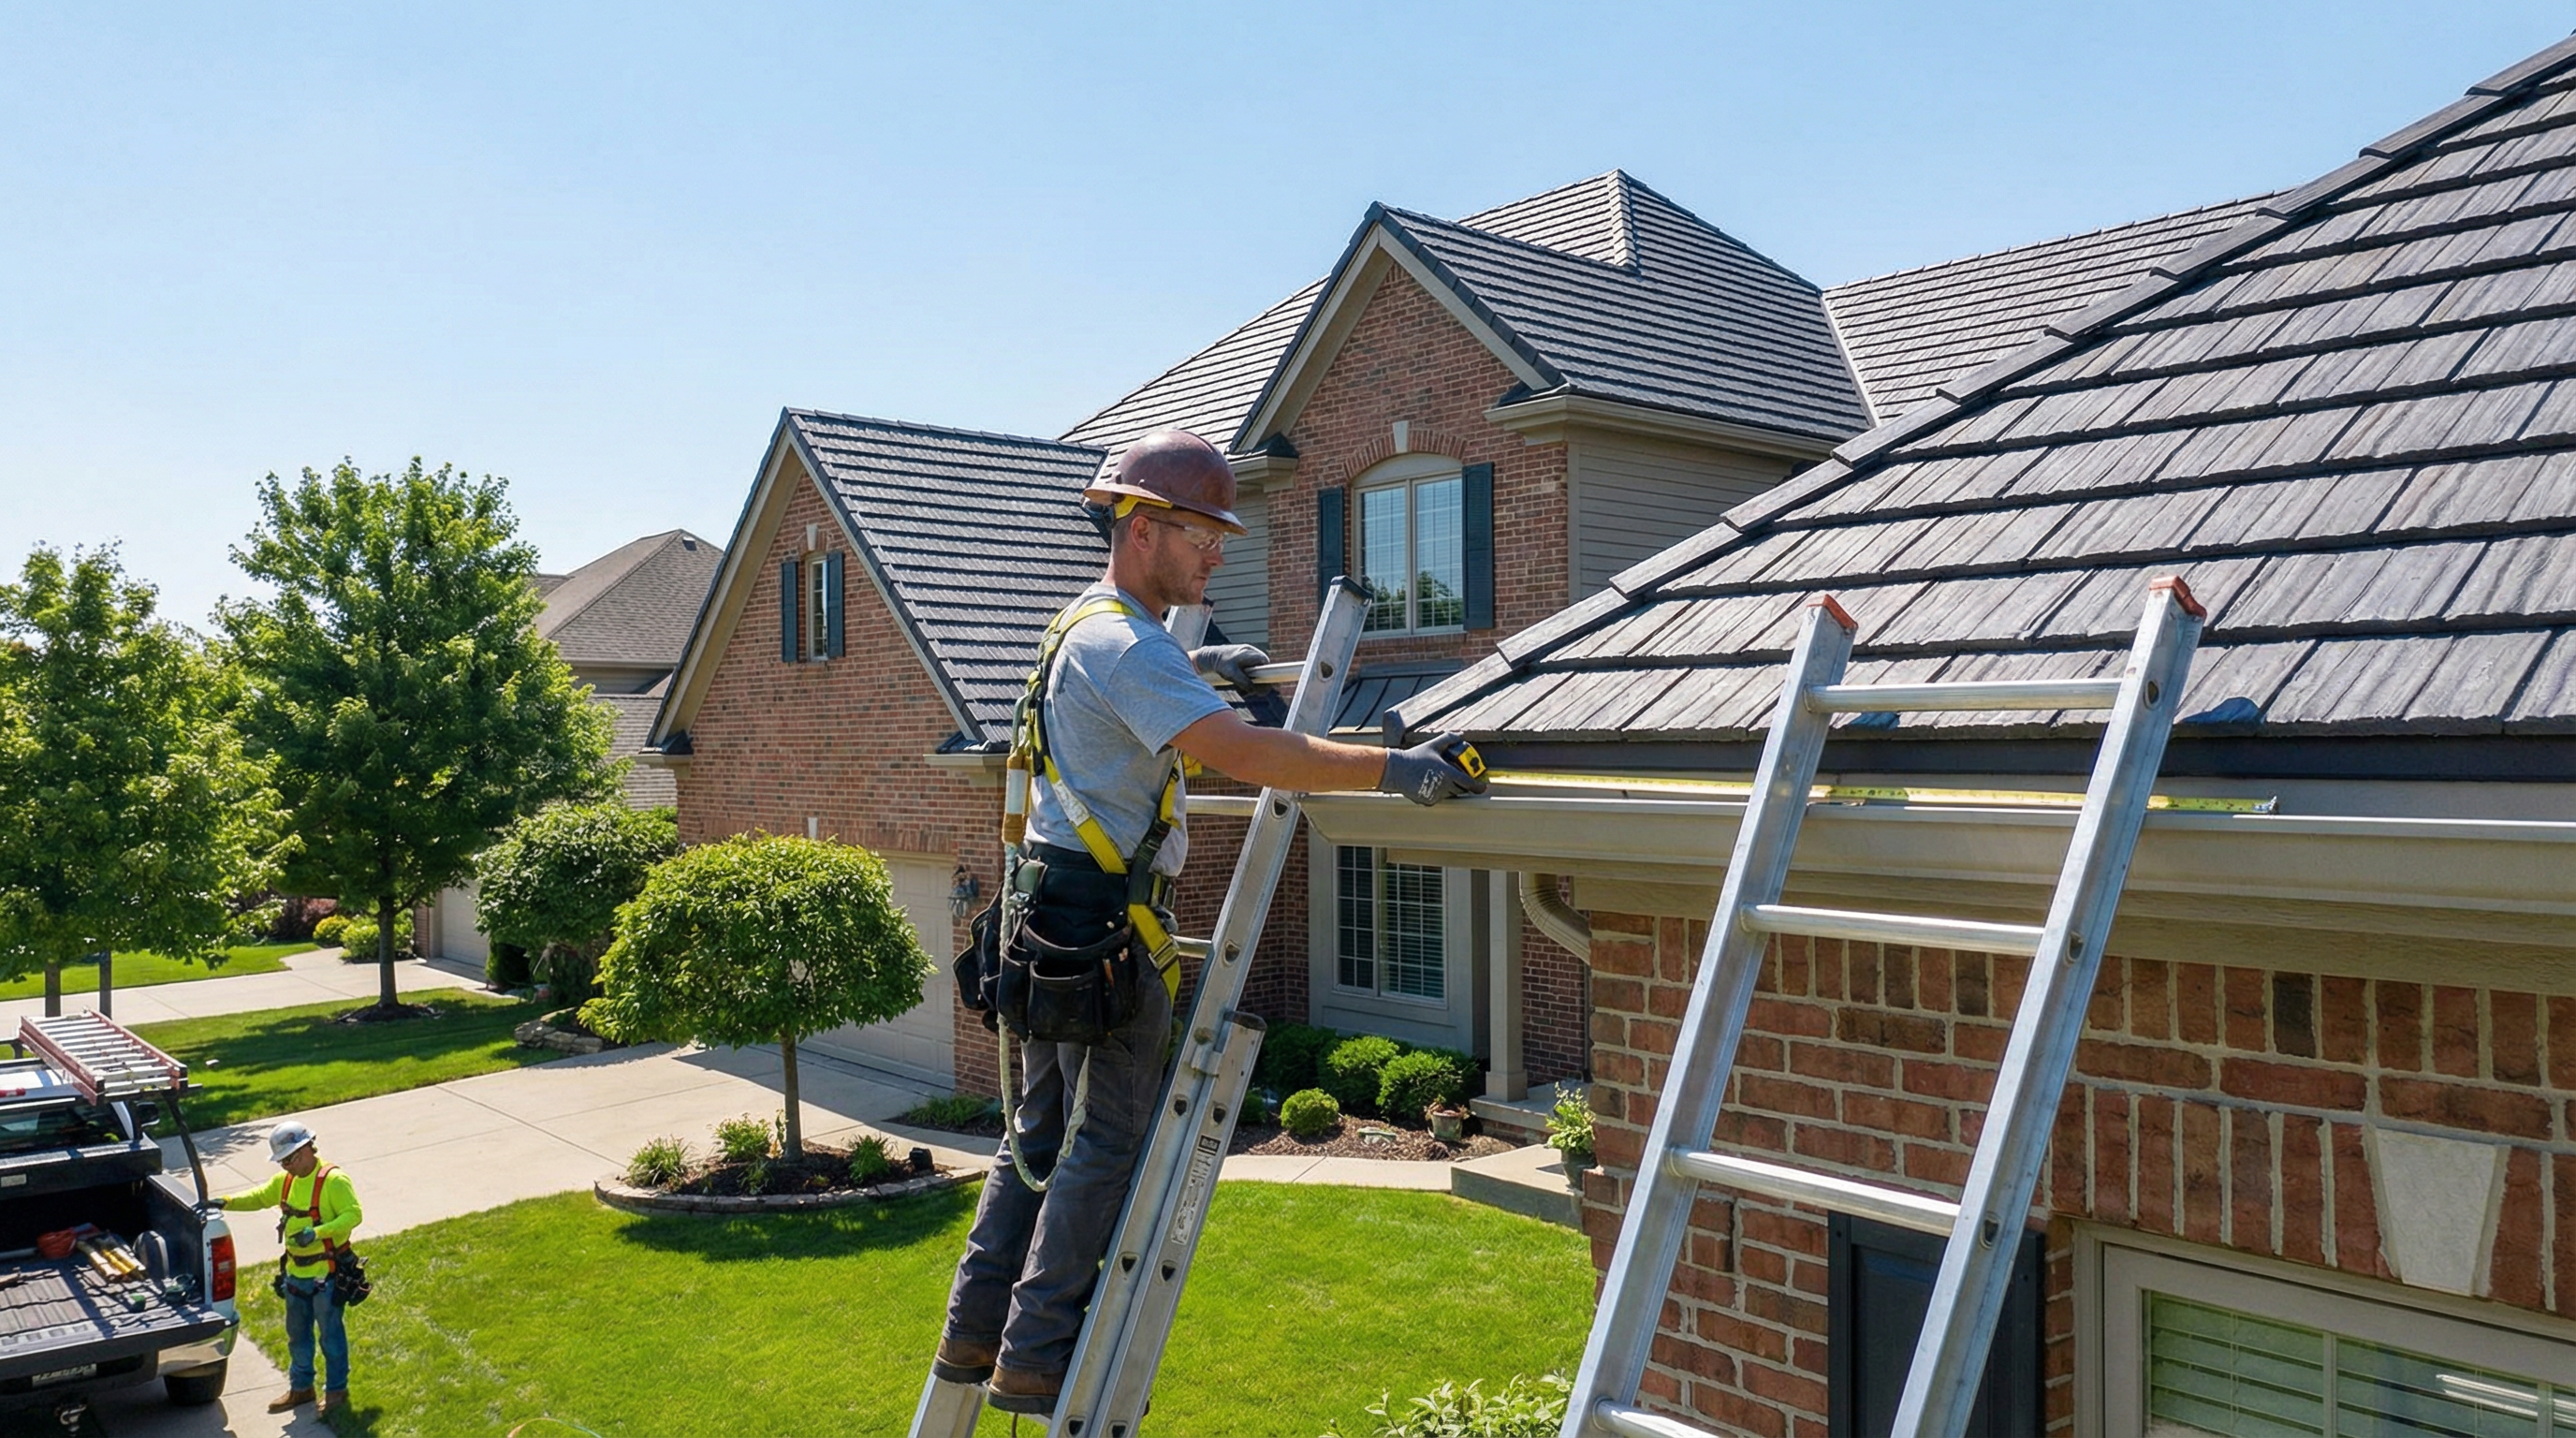
Before you even think about products, conduct a comprehensive site assessment. Walk the property with the client to understand their goals. Are they looking for dramatic holiday displays, subtle architectural accenting, or both? Identify all rooflines, gables, dormers, and peaks they want to be illuminated. Take precise measurements of every single roofline section. Don’t forget to factor in the power source location. You’ll need a dedicated, GFCI-protected outlet, and its location will dictate your wiring strategy and whether you need to run conduit for a clean, code-compliant installation.
How to Choose the Right Permanent Lighting System
The market is flooded with options, but professional contractors should steer clear of consumer-grade products. For roofline applications, you need a commercial-grade system. Look for an IP67 or IP68 rating, which ensures the lights and connections are fully protected from dust and water immersion. The system should be rated for at least 50,000 hours of use and come with a robust manufacturer’s warranty (3-5 years is standard). Key components to evaluate are the LED lights (pucks or strips), the mounting track, the power supply, and the controller. A system that offers a complete, integrated solution is almost always better than piecing components together from different brands.
Pro Tip: Always create a professional mockup for your client. Using a tool like the IgnitelyAI mockup generator allows you to upload a photo of the client’s home and show them exactly what the finished installation will look like. This manages expectations, helps upsell more extensive coverage, and secures the sale.
Essential Tools and Materials for a Professional Installation
Showing up to a job site with the right tools is non-negotiable. It signals professionalism and ensures you can handle any challenge that arises. Here’s a checklist of what you should have in your truck for every roofline installation.
| Category | Tool/Material | Purpose |
|---|---|---|
| Measurement & Layout | Laser Measure & Tape Measure | For precise roofline measurements. |
| Mounting | Drill/Driver with Bits | For securing mounting tracks. |
| Mounting | Color-Matched Screws/Fasteners | To blend with the fascia/soffit. |
| Wiring | Wire Strippers & Cutters | For preparing low-voltage wires. |
| Wiring | Waterproof Connectors/Splices | Crucial for protecting connections from moisture. |
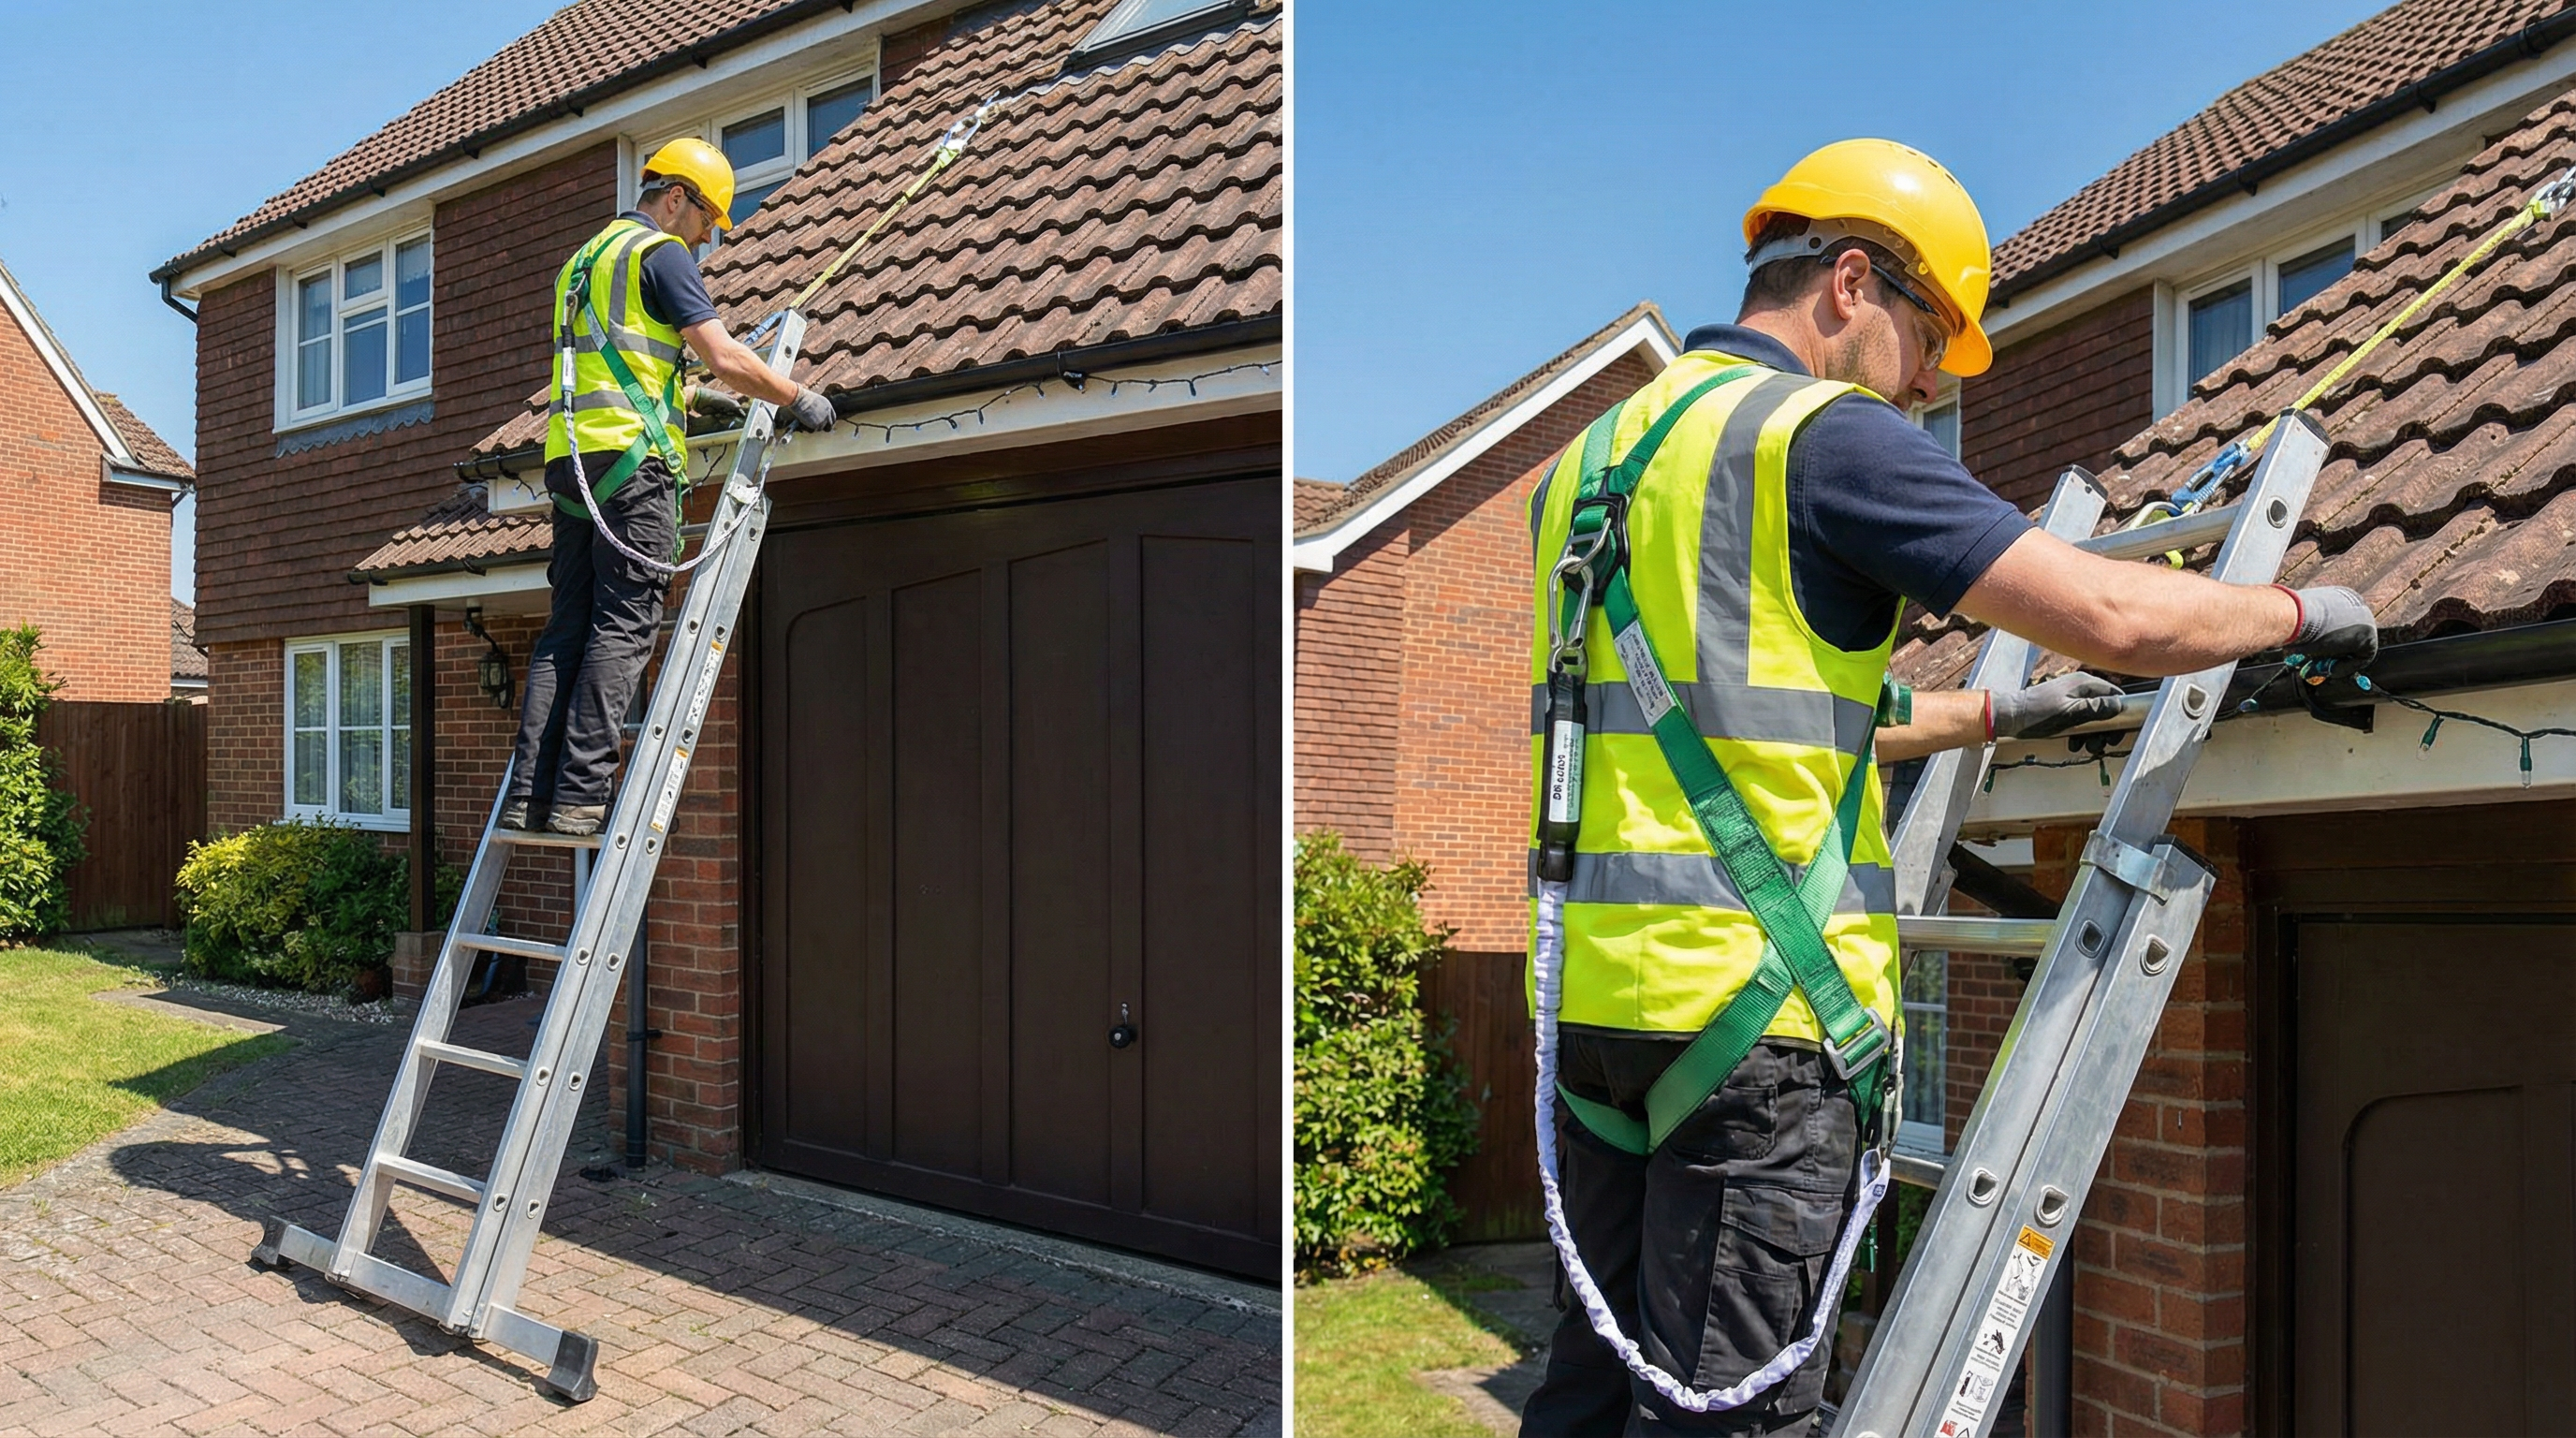
| Safety | Ladder with Stabilizer | For safe access to the roofline. |
| Cleaning | Isopropyl Alcohol & Rags | For cleaning surfaces before mounting. |
The Step-by-Step Roofline Installation Process
With your plan in hand and tools at the ready, it’s time to execute the installation. Follow these steps methodically for a clean, secure, and long-lasting result.
Step 1: Surface Preparation is Non-Negotiable
You can’t mount a track securely to a dirty surface. Use a pressure washer or a stiff brush to remove all dirt, grime, cobwebs, and loose paint from the fascia and soffit where the lights will be installed. Once dry, give the entire surface a final wipe-down with isopropyl alcohol to ensure a perfectly clean bonding surface.
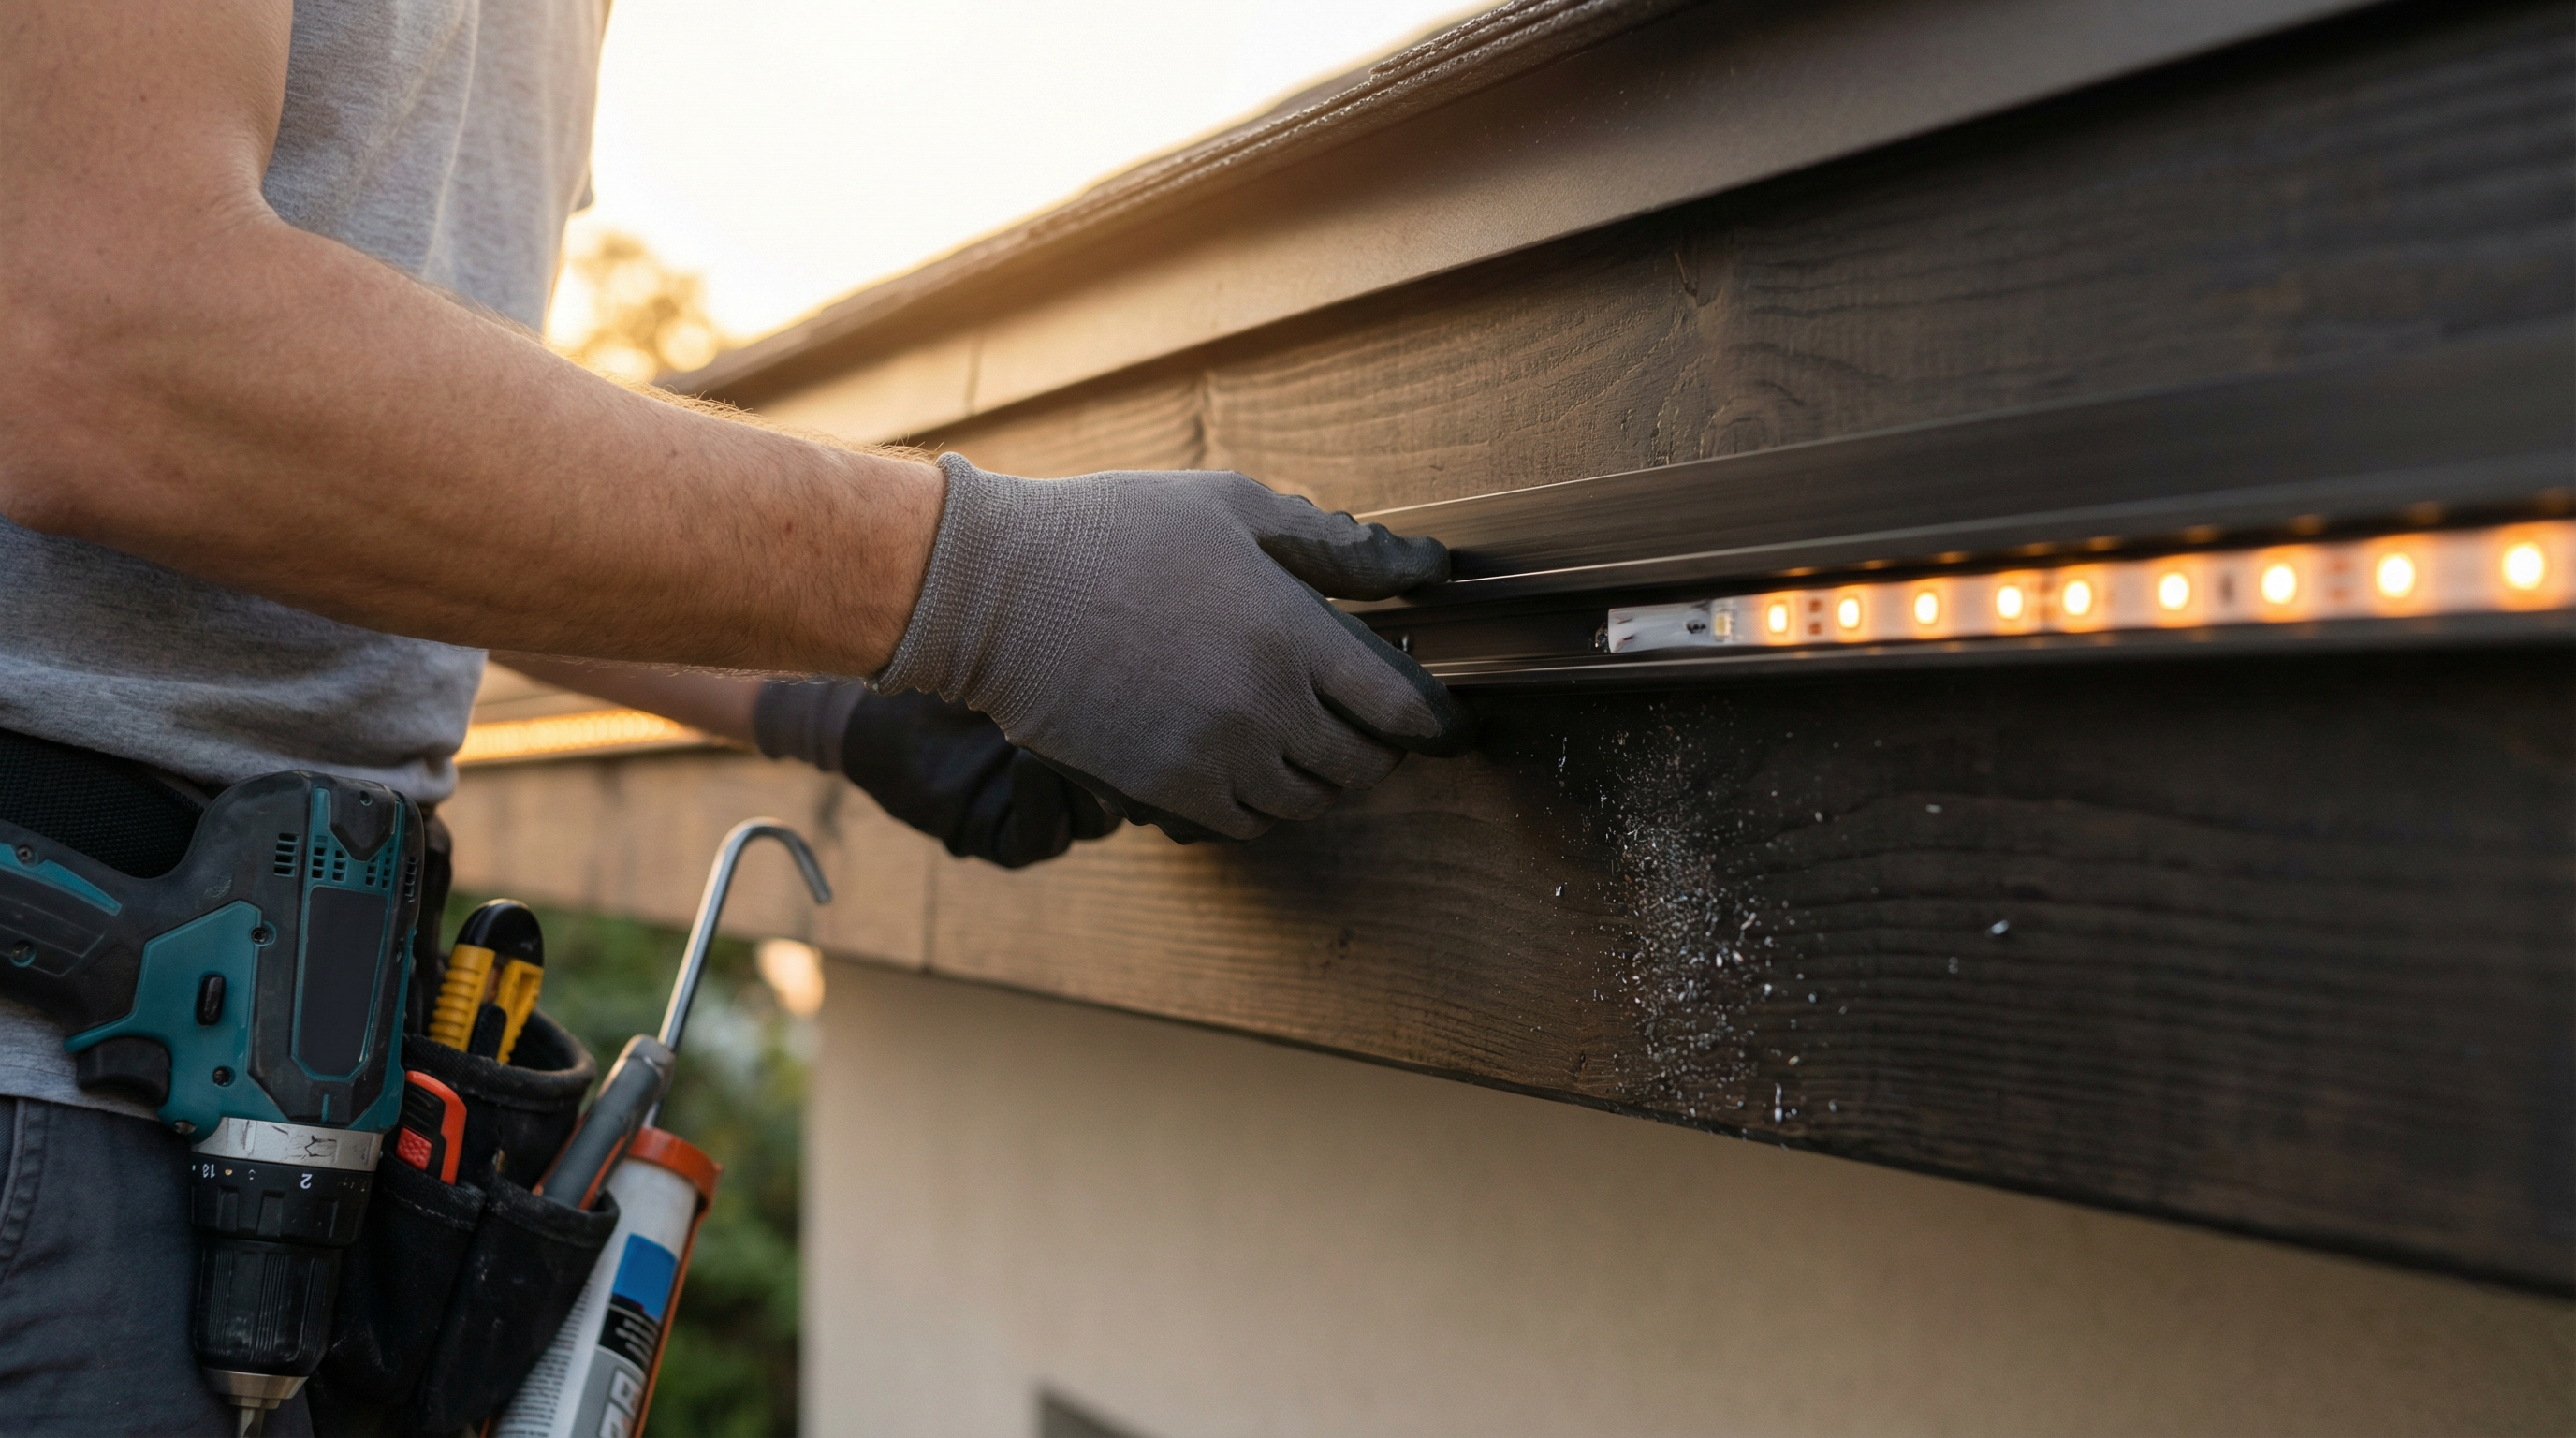
Step 2: Mounting the Track or Channel
Most professional systems use an aluminum or PVC track that the lights snap into. This is the key to a perfectly straight, uniform look. Cut the track to your measured lengths for each section. Mount the track securely to the soffit or fascia using color-matched, weather-resistant screws. The goal is for the track to be as inconspicuous as possible, blending seamlessly with the home’s architecture. For more on different mounting techniques, check out our guide on the best clips and mounting methods.
Step 3: Installing the LED Pucks or Strips
With the track in place, it’s time to install the lights. Most systems have the lights on a flexible wire that you simply press into the channel. Pay close attention to the direction of the data signal (usually indicated by an arrow on the wire or pucks) to ensure the lights will communicate correctly with the controller. Maintain consistent spacing as you go.
Step 4: Strategic Wiring and Connections
This is where a professional installation truly shines. Plan your wiring runs to be as hidden as possible. Use jumper cables to cross gaps like dormers or to move between different roof levels. All outdoor connections must be made with IP68-rated waterproof connectors. Tuck wires into J-channel, behind downspouts, or in attic spaces whenever possible. A clean wiring job is a signature of a true pro. For complex wiring scenarios, our in-depth wiring guide can be a lifesaver.
Step 5: Power Supply and Controller Integration
Mount the power supply and the controller in a protected, weatherproof location, such as a garage or basement, near the designated outlet. Run the main power lead from the start of your lighting run to the controller. Follow the manufacturer’s instructions precisely for connecting the lights, controller, and power supply. Once everything is connected, power up the system and use the smartphone app to connect to the controller and begin testing.
How Do You Handle Complex Rooflines and Obstacles?
Flat, straight rooflines are easy. The real test of skill comes with complex architecture. For peaks and gables, you’ll need to make precise miter cuts in your track to create a clean angle. For jumping from a first-story roofline to a second-story one, you’ll run a jumper wire, hiding it behind a downspout or using a color-matched conduit for a clean vertical run. The key is to treat every wire as a design element that needs to be either perfectly hidden or perfectly straight and clean.
Post-Installation: Commissioning and Client Handoff
The job isn’t done when the last light is installed. A professional handoff ensures client satisfaction and reduces follow-up service calls.
System Testing and Programming
Cycle through all the colors to check for any dead or malfunctioning pixels. Test the app’s functionality, including scheduling, scene creation, and music sync if available. Program a few basic scenes for the client to get them started—a classic warm white, a holiday theme, and their favorite sports team’s colors are always great options.
Educating the Client
Spend 15-20 minutes walking the client through how to use the app. Show them how to turn the lights on and off, change colors, select scenes, and set schedules. This small investment in time empowers the client, makes them feel comfortable with their new system, and dramatically increases their perceived value of the service you provided.
Troubleshooting Common Installation Issues
Even with the best planning, challenges can arise during an installation. Knowing how to troubleshoot common issues quickly is crucial for maintaining efficiency and profitability. Here are a few problems you might encounter and how to solve them.
- A Section of Lights is Not Working: This is one of the most common issues. First, check the data flow direction, usually indicated by arrows on the wiring or the pucks themselves. The signal must flow from the controller outwards. Second, inspect all connections leading to the dead section. A loose or improperly seated waterproof connector is often the culprit. Finally, carefully inspect the wire for any pinches or damage that may have occurred during installation.
- Lights are Flickering or Showing Incorrect Colors: This is typically a sign of power or data issues. If it's happening at the end of a long run, you may be experiencing voltage drop. This means the power supply is too far from the end of the line. You may need to run a power injection wire from the power supply to the end of the run to maintain consistent voltage. If the colors are wrong, it could be a data corruption issue; double-check all data line connections.
- Controller Won't Connect to Wi-Fi: Most permanent lighting controllers operate on a 2.4GHz Wi-Fi network. Ensure the client's network has a 2.4GHz band enabled and that the controller is within range. If the signal is weak in the garage or wherever the controller is mounted, you may need to install a simple Wi-Fi extender to ensure a stable connection for the client.
Beyond the Install: Building Long-Term Value
The client handoff is not the end of the relationship; it's the beginning of a new phase. Permanent lighting is a platform for ongoing service and revenue. Consider offering annual maintenance and programming packages. For a yearly fee, you can offer a pre-holiday season check-up, clean the tracks and lenses, and update their system with new scenes and shows. This not only creates a recurring revenue stream but also keeps you engaged with your client, making you their go-to contractor for any future lighting or outdoor projects. By positioning yourself as a long-term partner in their home's beauty and functionality, you elevate your business from a simple installer to a trusted home service provider.
Frequently Asked Questions
What are the best permanent Christmas lights for professional installation?
Professionals should look for commercial-grade systems with an IP67 or IP68 rating, a 50,000-hour lifespan, and a strong manufacturer warranty. Integrated systems with dedicated tracks, power supplies, and controllers are preferable to piecing components together.
How much does it cost to have permanent Christmas lights installed?
The cost for a professional installation can range from $2,000 to over $10,000. The final price depends on the size of the home, the complexity of the roofline, product quality, and local labor rates.
Can you install permanent lighting yourself?
While DIY is possible, it requires significant technical skill, electrical knowledge, and comfort working at heights. For a safe, clean, and warrantied result that stands the test of time, hiring a professional contractor is highly recommended.
How long do permanent LED Christmas lights last?
High-quality, commercial-grade permanent LEDs are typically rated for 50,000 hours of operation. For most homeowners, this translates to 15-20 years of use without significant degradation.
How do you hide permanent Christmas light wires?
Hiding wires is a mark of a pro. Use jumper cables to cross gaps, and conceal them in J-channel, behind downspouts, or within attic spaces. For visible vertical runs, use color-matched conduit to blend in with the home's exterior.
What is the best spacing for permanent outdoor lights?
The ideal spacing depends on the product and desired effect. A common standard is 9 to 12 inches between pucks. Closer spacing creates a more seamless line of light, while wider spacing offers a scalloped look. Always follow the manufacturer's recommendation.
Ready to Transform Your Lighting Business?
Join thousands of lighting contractors using IgnitelyAI to create stunning mockups, close more deals, and grow their business.
Start Your Free Trial